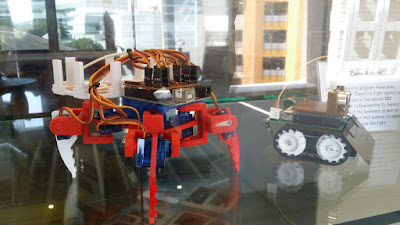
Today i will be showing you how i made my own quadruped. I was only a year one student at Singapore Polytechnic that time when I was doing this small project. Having no prior knowledge of electronics or circuits, I met with many obstacles along the way. Hopefully after reading through my post, you would be able to learn from my mistakes and finally start your own projects. Currently as of writing this, I am already year two. I should have documented it earlier. now i try my best to recall and write it down.
Plans:
For the micro controller, I am using a Arduino Uno. For the servo moving the legs of the quadrupeds, SG90 9G Mirco Servo is used. Since this was my very first project, all the part were provide by my project supervisor. The idea for this project came from http://www.thingiverse.com/thing:343420.
1: Testing
The first step I did was to test all the 8 servo that was given to me using the Arduino sweep example program ( https://www.arduino.cc/en/Tutorial/Sweep ), as advised by my project supervisor. Although testing a few servos might be troublesome, it is a good habit to start cultivating early on especially when you start to move on to more complicated projects.
2: Circuit Design
I had a lot of trouble when it came to this step. The first new concept that i couldn't understand that well was the doing the Arduino shield. Shields are boards that can be plugged on top of the Ardunino PCB extending its capabilities. To a veteran in electronics, this concept will be very simple but to someone who has never done anything like this before is very daunting. Other problem would that i didn't quite understand quite how electricity worked, my very first few shield I made had the pins in wrong position and the ground wrongly wired. Eventually, I managed to produce something that was workable.
3: Fabrication
For this step, I made a little error at the start. I
downloaded the files from the project linked above and printed it out using my school’s
3D printers. I assumed that all of it will fit together nicely, however this is
not always the case. I tried to re scale the 3D object to hopefully be able to
fit all of it together. It did not work out. So, i had to learn how to draw out
my 3D projects. The software i used was SketchUp. At that point of time, I had
a very helpful Technical Support Officer (TSO) to teach me about the basic of
using Sketchup. To convert skp file to stl file, go to the Window tab in
SketchUp. In the tab, click extension warehouse. Search for an extension called
SketchUp STL and install. This will allow you to export the SketchUp object in stl.
Links to download my version of quadruped will be down below.
4: Assembly
Now is the time to put everything together. For the servo to slide into place, i had to disassemble each of them and put them in place. To disassemble the servo, remove the screws at the bottom holding the servo together. Then carefully remove the cover remember how each of the gear was position. Sometimes when the print job was bad, you will have to sand the edges to get the servo in place. After sliding the servo in place, assemble the servo as you disassembled. To secure the shoulder, I used 4 0.5 cm nuts. Each of the servo is secure by 0.5 cm screws that i brought from a screw shop. The hip and backbone is secured by a 1.5 cm deep screw while the rest is 0.5 cm deep screws. The body and the backbone is secured with a washer and a 1.5 cm deep screw.
5: Code
Depending on the circuit design, the servo will be attached to different pins. During my testing, I use the arduino sweep example to test the range of movement for the quadruped.
Wok in Progress....
Part link: http://www.thingiverse.com/thing:2130743
Code link: https://gist.github.com/ljunqian/6d3f5a4ec7d4fab077c56568e96ebe0d

Hi Jun Qian, I chanced upon this project when googling and am actually working on it as a hobby project. May I see a schematic for your circuit design? Can't see it clearly on instructables. Thank you!
ReplyDelete